Customizing Windows Terminal for PowerShell with Oh My Posh: A Guide to Personalized Prompts
Windows Terminal is a powerful tool for command-line interface users who want to customize their experience. One way to make the terminal more user-friendly is by using Oh My Posh, which is a theme engine for PowerShell that provides a sleek and customizable prompt. By integrating Oh My Posh into Windows Terminal, users can enhance their PowerShell experience and make it more efficient and visually appealing. In this guide, we will explore how to install and use Oh My Posh in Windows Terminal to create a personalized prompt that suits your style and workflow.
It is pretty well documented in Oh My Posh and there is a great youtuebe video by Adam here - (only five minutes to watch) but if you want to jump in , install and configure right away here is how…
High Level Steps
- Install necessary applications
- Install Oh my posh
- Install fency fonts : )
- Configure Terminal and Vscode to change the font to that installed.
- Configure your Powershell profile to kick “Oh My Posh” with the desired Template.
Lets begin…
Installation
- Install Chocolatey: if you havent already yet, you will need this to install. Easy peasy steps just follow the link.
- Install Nerd Fonts: Nerd fonts is needed for Oh My Posh to work. Install them using below command.
choco install nerd-fonts-hack - Install Visual Studio Code: We will edit the theme files which are json and use vscode for this. We also will configure the vscode to support Oh My Posh
- Install Terminal: I hope you already did but for the ones who didnt yet, just follow the link and install.
- Install Oh My Posh: The steps are straight forward but lets speed up.
winget install JanDeDobbeleer.OhMyPosh -s winget
We are half way thru…Time to configure.
Lets configure now!
-
Pick yourself a template!: ‘Oh My Posh’ has builtin templates they are under the envirornment path POSH_THEMES_PATH. You can check in PowerShell using below.
gci $env:POSH_THEMES_PATHThe visuals of these themes can be found here. Have a look at them and note the name. I liked the Unicorn one but the default theme had 🦄 in the prompt, which is attractive for my daughter but not me. Dont worry we will change it as a customization example. For now lets remember we picked the unicorn!.
-
Optional Step! Modify the theme: Lets change the Unicorn (🦄 ) to Fox (🦊)
-
make a copy of the existing unicorn template.
copy-item -Path "$($Env:POSH_THEMES_PATH)\unicorn.omp.json" -Destination "$($Env:POSH_THEMES_PATH)\mytheme.omp.json" - Edit the template using vscode
code "$($Env:POSH_THEMES_PATH)\mytheme.omp.json" - Around line 80s you will see the json snippet like below.
{ "foreground": "#f1184c", "style": "plain", "template": "🦄 ", "type": "text" } - Change the emoji unicorn by pressing Win + .

- Save the file.
-
- Change the default font of Terminal: Open Windows terminal.
In Settings / Profile / Defaults / Appearance / TextchangeFont Faceto ‘Hack Nerd Font’ the one we installed.
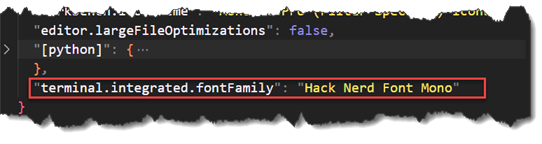
- Change the font in Vscode: Vscode terminal requires Mono fonts, luckily the hack nerd has one.
- open Vscode
- Hit F1 to open command pallete.
- type
Preferences: Open User Settings(Json)and open preferences - add the below line to the end of the settings.
- Final Step! lets configure PowerShell profile to enable OH My Posh: we need to one line to initialize the prompt as soon as the PowersHell starts. We will use the allusersAllHosts Profile to reflect the change for both Terminal and Vscode Terminal. Plese note if you have PowerShell 7 you will need to change the profile of Powershell 7 as well the steps are the same.
- Edit the profile profile by running below command
code $PROFILE.AllUsersAllHosts - Add the following line the file and save. Please dont forget the theme name to the desired one. We modified in this post our tempalte and saved into mytheme.omp.json
oh-my-posh init pwsh --config "$($Env:POSH_THEMES_PATH)\mytheme.omp.json" | Invoke-Expression
- Edit the profile profile by running below command
- Restart Windows Terminal and Visual Code and Enjoy!